
No Knead Dutch Oven Bread

No Knead Dutch Oven Bread is a warm, crusty loaf that has a texture and flavor that’s simply unparalleled. The beauty of this bread lies not only in its deliciously chewy interior and crisp crust but also in how effortlessly it comes together. With just a short prep time and minimal hands-on effort, you can create artisanal quality bread right in your own kitchen, all with a little bit of patience and a trusty Dutch oven.

Growing up, I always admired the inviting aroma of freshly baked bread wafting through my family home. Watching my grandmother knead dough for what felt like hours seemed intimidating, and I thought it was a skill reserved for only the most experienced bakers. That was until I stumbled upon the no-knead method, which changed everything for me! This No Knead Dutch Oven Bread is perfect for a simple weeknight dinner or an elegant gathering, and I can assure you it will quickly become a beloved staple in your home. So roll up your sleeves, gather your ingredients, and let’s bake some unbelievable bread together!
Table of Contents
Why You’ll Love This Recipe
- Simple & Quick: With only 10 minutes of prep, you’ll be ready to pop your dough in the oven in no time!
- Irresistible Flavor: Each bite offers a delightful combination of a crispy crust and a soft, airy center.
- Eye-Catching Appeal: This bread looks as stunning as it tastes, perfect for impressing guests.
- Flexible Serving: Enjoy it warm with butter, use it for sandwiches, or serve it alongside soups and salads.
- Budget-Friendly: All the ingredients are affordable and pantry staples that won’t break the bank!
Ingredients You’ll Need
- 3 ½ cups all-purpose flour: This is the base of your bread, giving it structure and chewiness. For a lighter loaf, consider using a bread flour alternative.
- 2 ¼ teaspoons active dry yeast: This is your leavening agent, responsible for that wonderful rise. Make sure it’s fresh for the best results.
- ½ teaspoon sugar (optional): While this is optional, a touch of sugar can help activate the yeast for an even fluffier bread.
- 1 ½ teaspoons salt: Salt enhances flavor and controls yeast activity, making it essential.
- 1 ¼ cup warm water (100 degrees or so): Essential for activating the yeast. A meat thermometer works great to ensure you’re at the right temperature.
How to Make No Knead Dutch Oven Bread
- Activate the Yeast: In a medium bowl, add the 2 ¼ teaspoons of active dry yeast, optional ½ teaspoon sugar, and 1 ½ teaspoons of salt. Pour in 1 ¼ cups of warm water and whisk until everything dissolves.
- Let It Foam: If you opted for sugar, allow the mixture to sit for 5-10 minutes until it’s foamy. This indicates that your yeast is alive and kicking!
- Combine the Ingredients: Add 3 ½ cups of all-purpose flour to the wet mixture. Stir with a spoon until it forms a sticky dough ball. If your dough seems too dry, add 1 tablespoon of water at a time; if too wet, sprinkle in flour gradually.
- Let It Rise: Cover the bowl with foil, plastic wrap, or a kitchen towel, and let the dough rise in a warm place for about 2-3 hours until it has doubled in size.
- Preheat the Oven: Adjust your oven racks to fit the Dutch oven, and place it on the lowest rack. Preheat your oven to 450 degrees Fahrenheit. Once heated, let it continue to warm for an additional 15-20 minutes.
- Prepare for Baking: Carefully scrape the sticky dough out of the bowl onto a 15”x15” piece of parchment paper. Sprinkle a little flour on it and shape it with the parchment, making any desired cuts or designs on the top.
- Bake the Bread: When the Dutch oven is properly preheated, remove the lid using potholders and carefully place the parchment with the dough inside. Immediately cover and bake for 20 minutes. Afterward, remove the lid and bake for another 5-10 minutes or until the crust is golden brown.
- Cool and Serve: Once baked, remove the Dutch oven from the oven. Lift the loaf out using the parchment and place it on a wire rack. Allow it to cool for about 20 minutes before slicing and serving.
Storing & Reheating
To keep your No Knead Dutch Oven Bread fresh, store it at room temperature in a paper bag for up to 2 days. If you wish to keep it longer, transfer the bread to an airtight container in the refrigerator for up to a week. You can also freeze slices for up to 3 months. To reheat, place the slices in a toaster or warm them in an oven set at 350 degrees Fahrenheit for a few minutes. Remember, the texture may vary a bit after freezing, but a quick refresh in the oven will bring back that lovely crust!
Chef’s Helpful Tips
- Ensure your yeast is fresh; expired yeast can lead to dense bread.
- Use a digital thermometer to accurately check the water temperature; too hot can kill the yeast.
- Allowing the dough to rest fully during the rise phase improves flavor and texture.
- If your dough appears too wet, additional flour can help; conversely, too dry means more water.
- Play with flavors by adding herbs or cheese to the dough before the first rise for extra pizzazz.
There’s something truly magical about homemade bread. This No Knead Dutch Oven Bread stands as a testament to the power of good ingredients and patience. It’s easy to make and requires minimal kneading, making it approachable for bakers of all levels. The aroma fills your home with warmth, and the first slice burst with crusty goodness is a culinary joy. Don’t shy away from experimenting with herbs, or even try a swirl of garlic butter just before baking; the possibilities are endless!

Recipe FAQs
Can I use whole wheat flour instead of all-purpose flour?
How long can I let the dough rise?
What if my bread turns out too dense?
Can I add ingredients, like cheese or herbs, to the dough?
⭐ If you make my No Knead Dutch Oven Bread recipe, Awesome! I would love to hear from you. Please give it a star rating and review below! 👇
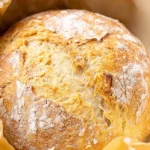
No Knead Dutch Oven Bread
Enjoy homemade No Knead Dutch Oven Bread that boasts a flavorful crust and soft interior. Perfect for serving with meals or enjoying on its own, this simple recipe is accessible to everyone, making it a go-to option for warm, comforting bread anytime.
- Prep Time 10 minutes
- Cook Time 160 minutes
- Yield 1 loaf 1x
Ingredients
- 3 ½ cups all-purpose flour
- 2 ¼ teaspoons active dry yeast
- ½ teaspoon sugar optional
- 1 ½ teaspoons salt
- 1 ¼ cup warm water 100 degrees or so, use a meat thermometer to test
Instructions
- In a medium bowl, combine the yeast, sugar, and salt.
- Pour in the warm water and whisk until dissolved.
- If using sugar, let the mixture sit for 5-10 minutes until foamy; skip this step if not using sugar.
- Add flour to the mixture, stirring until it forms a sticky dough ball; adjust moisture with water or flour as needed.
- Cover the bowl with foil, plastic wrap, or a kitchen towel and let the dough rise in a warm area for 2-3 hours.
- Preheat the oven to 450 degrees, placing the Dutch Oven (with lid) on the lowest rack while heating.
- Allow the Dutch Oven to heat for 15-20 minutes once the oven reaches 450 degrees.
- Scrape the dough onto a piece of parchment paper, shaping it gently with flour.
- Optionally, cut a slit or design into the dough with a sharp knife.
- Carefully remove the Dutch Oven lid and place the parchment paper with the dough inside.
- Replace the lid and bake for 20 minutes; then remove the lid and bake for an additional 5-10 minutes until golden brown.
- Take out the bread using the parchment edges and let it cool on a wire rack for about 20 minutes before slicing.
Notes
Ensure the water is warm, not hot, to activate the yeast properly.
Allowing the dough to rise in a warm environment improves the texture of the bread.
You can add herbs or garlic for an extra flavor boost.
Nutrition
- Serving Size: 1 slice
- Calories: 90
- Sugar: 0g
- Sodium: 160mg
- Fat: 0.5g
- Saturated Fat: 0g
- Unsaturated Fat: 0g
- Trans Fat: 0g
- Carbohydrates: 19g
- Fiber: 0.5g
- Protein: 3g
- Cholesterol: 0mg
Nutritional information is an estimate. The nutritional values for your final dish may vary based on measuring differences and products used.